Forgot to bring a pair of bedroom slippers? Cold floor at overseas accommodation? This was precisely me on two different accounts, except that I couldn’t be bothered to bring an extra pair of slippers when travelling. So far, I had made 3 pairs in total, with the last prototype being the most successful version – which is what I will be sharing in this post.
#1 – DIY Slip-On Slipper, Made in Spain:
My #1 prototype was made in Spain: We had two freezing nights up in Sacromonte region in Granada (yes the cave areas). The accommodation we had booked was freezing with a heater that doesn’t work. So it was the very first time I needed a slipper!

Made in Spain
It wasn’t that well-made, just made with the spare maps I had collected during the trip. The chosen style was slip-on type. Sadly I don’t have the original photo and had to resort to cropping it from my IG:
#3 – DIY Flip-Flop Slipper, Made in Australia
#2 and #3 prototypes were both born in Australia, Perth. I think it was our third accommodation when I finally couldn’t bear super the cold floor tiles during the winter season. So while others were busying away with BBQ, I worked on my little project here – with them being amused when they saw what I was doing.
#2 prototype wasn’t worth a mention since it failed fast. Isn’t that the best for all possible experiments – to fail fast! Finally my #3 prototype was made on the same evening, and it was the most satisfactory version: it looks just like a flip-flop!

Made in Australia, Handmade with Luv~
So this was made with newspaper and from the sparingly few plastic bags we had collected from groceries. Aussie is an eco-friendly country so we didn’t collect a lot of plastic bags – I had to make sure they don’t go wasted! While making it, I realised I could already own a car in Aussie dollars.
DIY Steps
Materials:
- Any sort of paper ~ newpaper, cardboard, maps, etc, etc
- Ties (anything that are long and don’t break off easily can function as ties. Typically, plastic bags would be good for this)
Steps:
- Grab a bunch of papers for one foot, use your foot to measure the width and length you need for the slipper. Width-wise, it should go up slightly above the sides of your foot. The bunch of papers should be somewhat thick enough to withstand fair amount of friction, depending on how many days you wish for this to last.
- Fold the papers into the width and length you need.
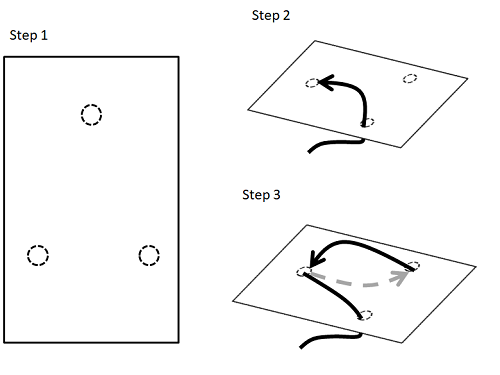
- Cut 3 holes as illustrated in above figure. For the holes on the side, ensure that the holes are not too near the edges of the paper.
- Then thread the ties through the 3 holes as illustrated in Step 2 and Step 3.
- Fit your foot in and adjust the ties.
- After fitting, tie up the 2 ends of the ties at the bottom of the slipper.
- Repeat for the other foot!
Tada! There you have your own DIY slipper. This is not made to withstand all weather, but only to get through some of the cold floor overseas. It is likely not waterproof and slip-proof, so while you are walking in them, do be careful!